Revset
Book a Free Audit

30-minute call · No obligation

HomeGHL HubCRM & ContactsSet Up Professional Email Signatures for Your Staff in GHL
REVSET LABS · EXPERT GUIDE·CRM & Contacts

Set Up Professional Email Signatures for Your Staff in GHL

840 words·4 min read·Updated 27 April 2026·beginner·
Arsalan ZaffarArsalan ZaffarLinkedIn

👉 Start your 30-day GoHighLevel free trial.
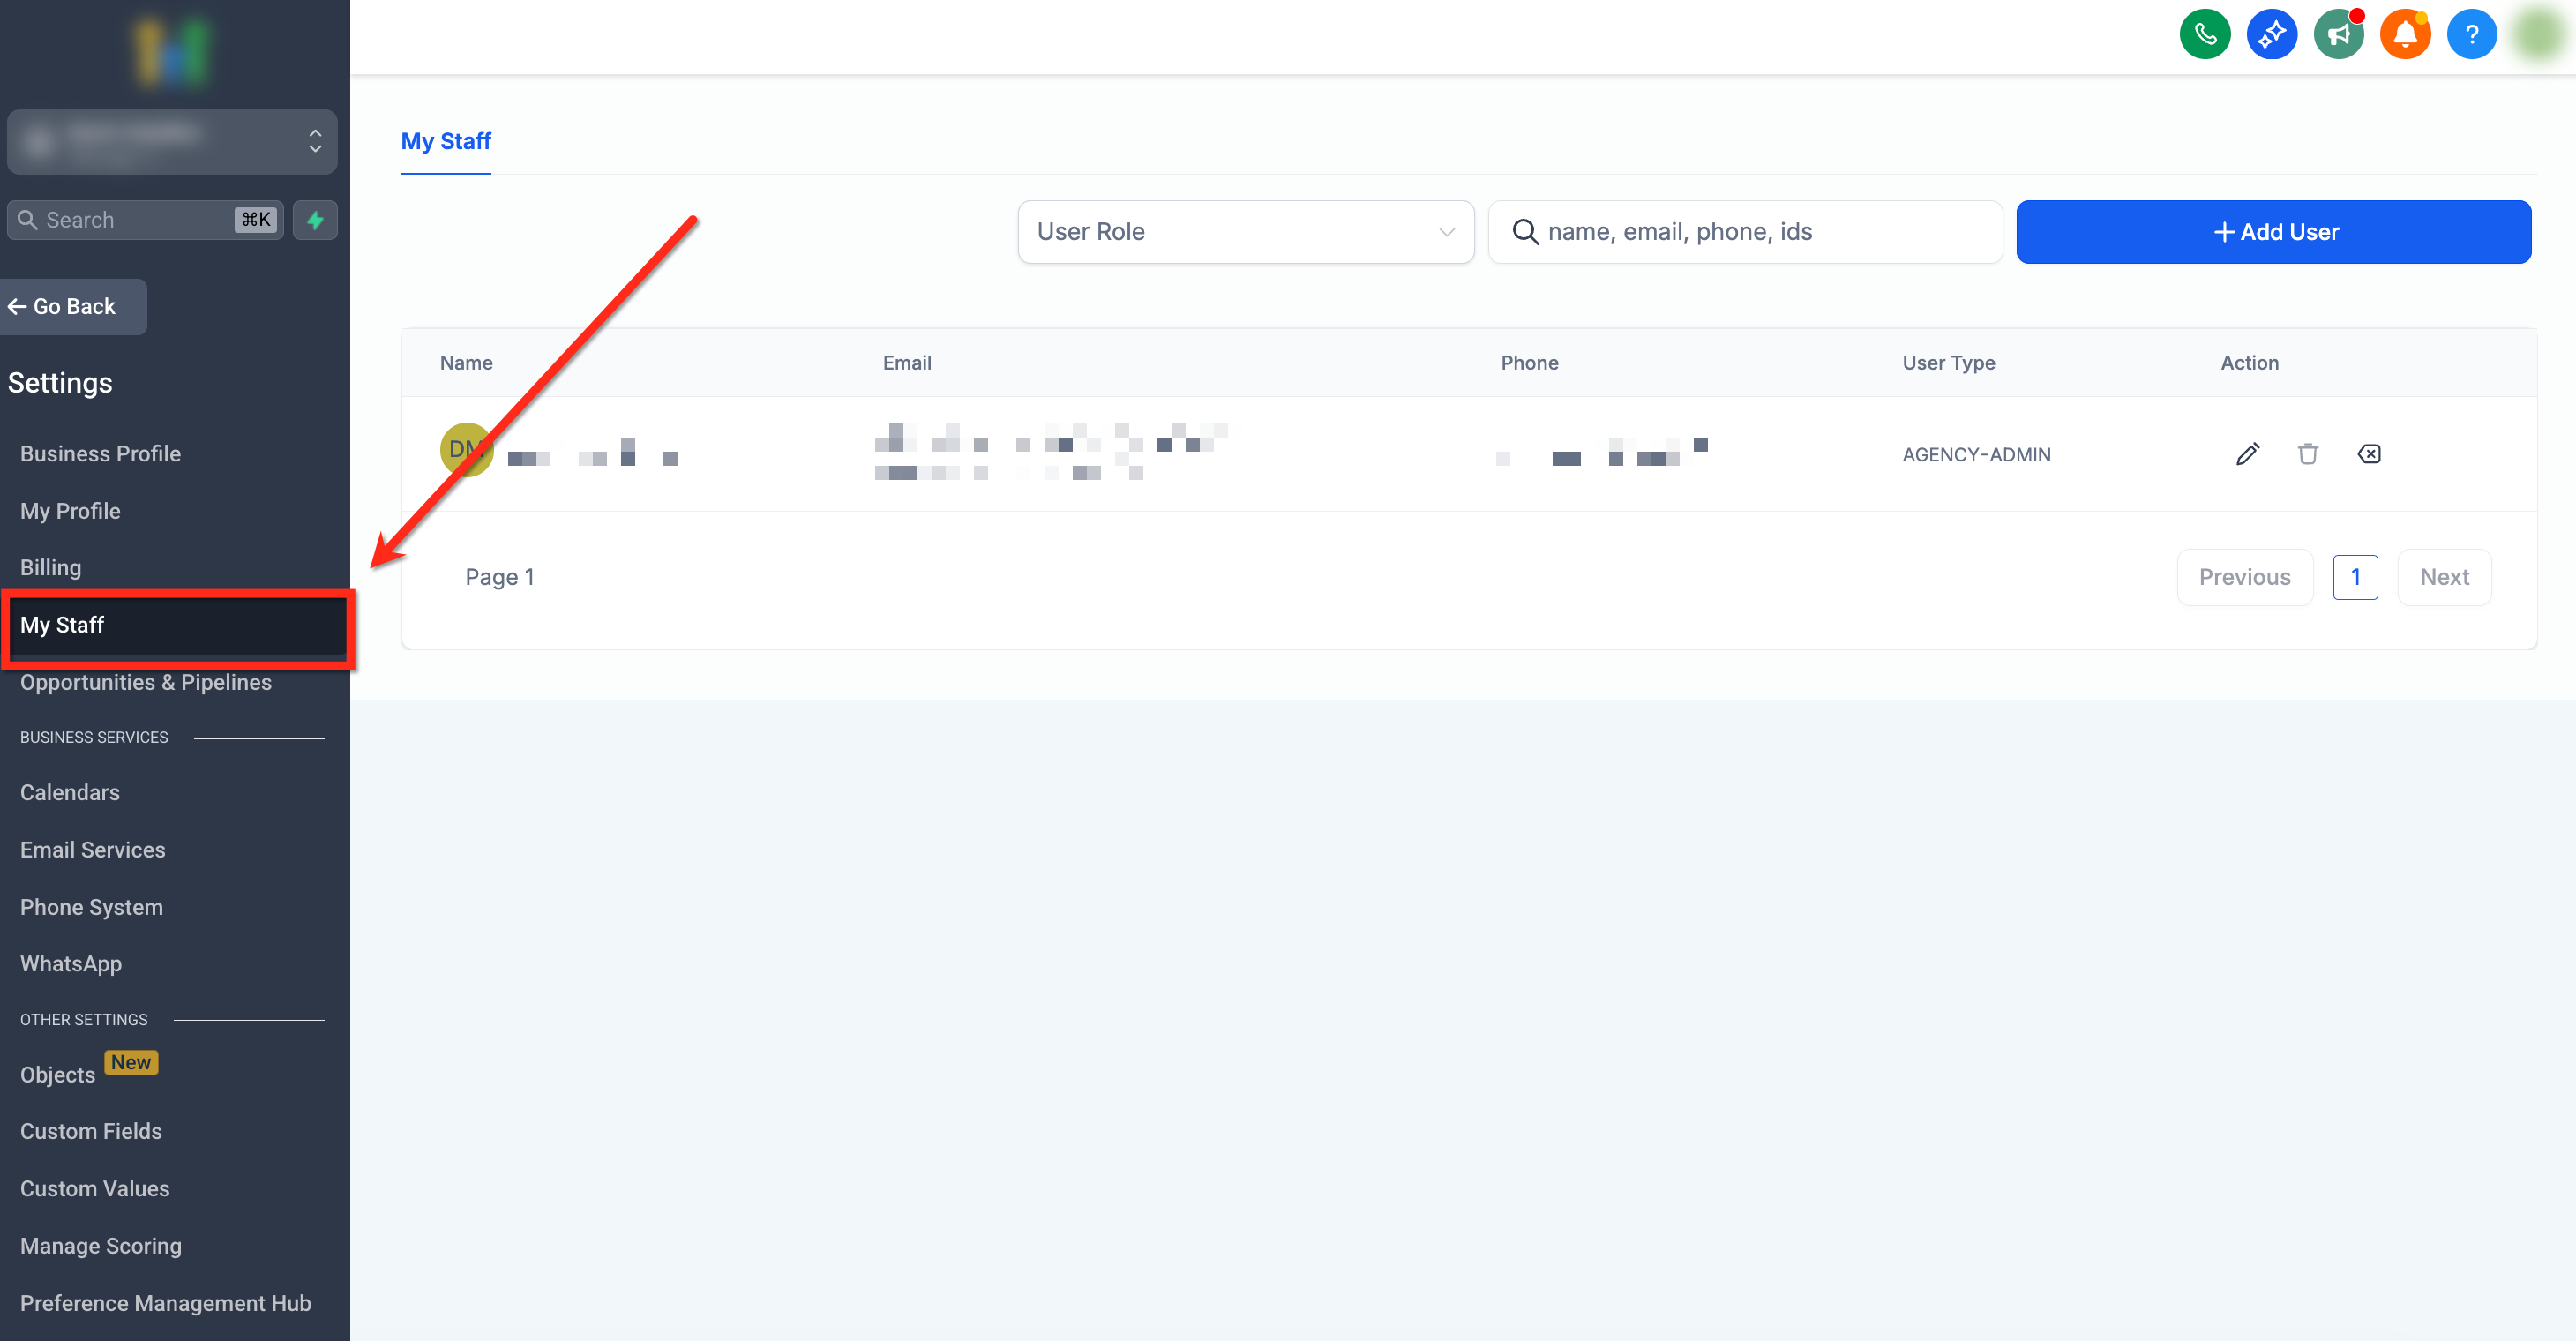
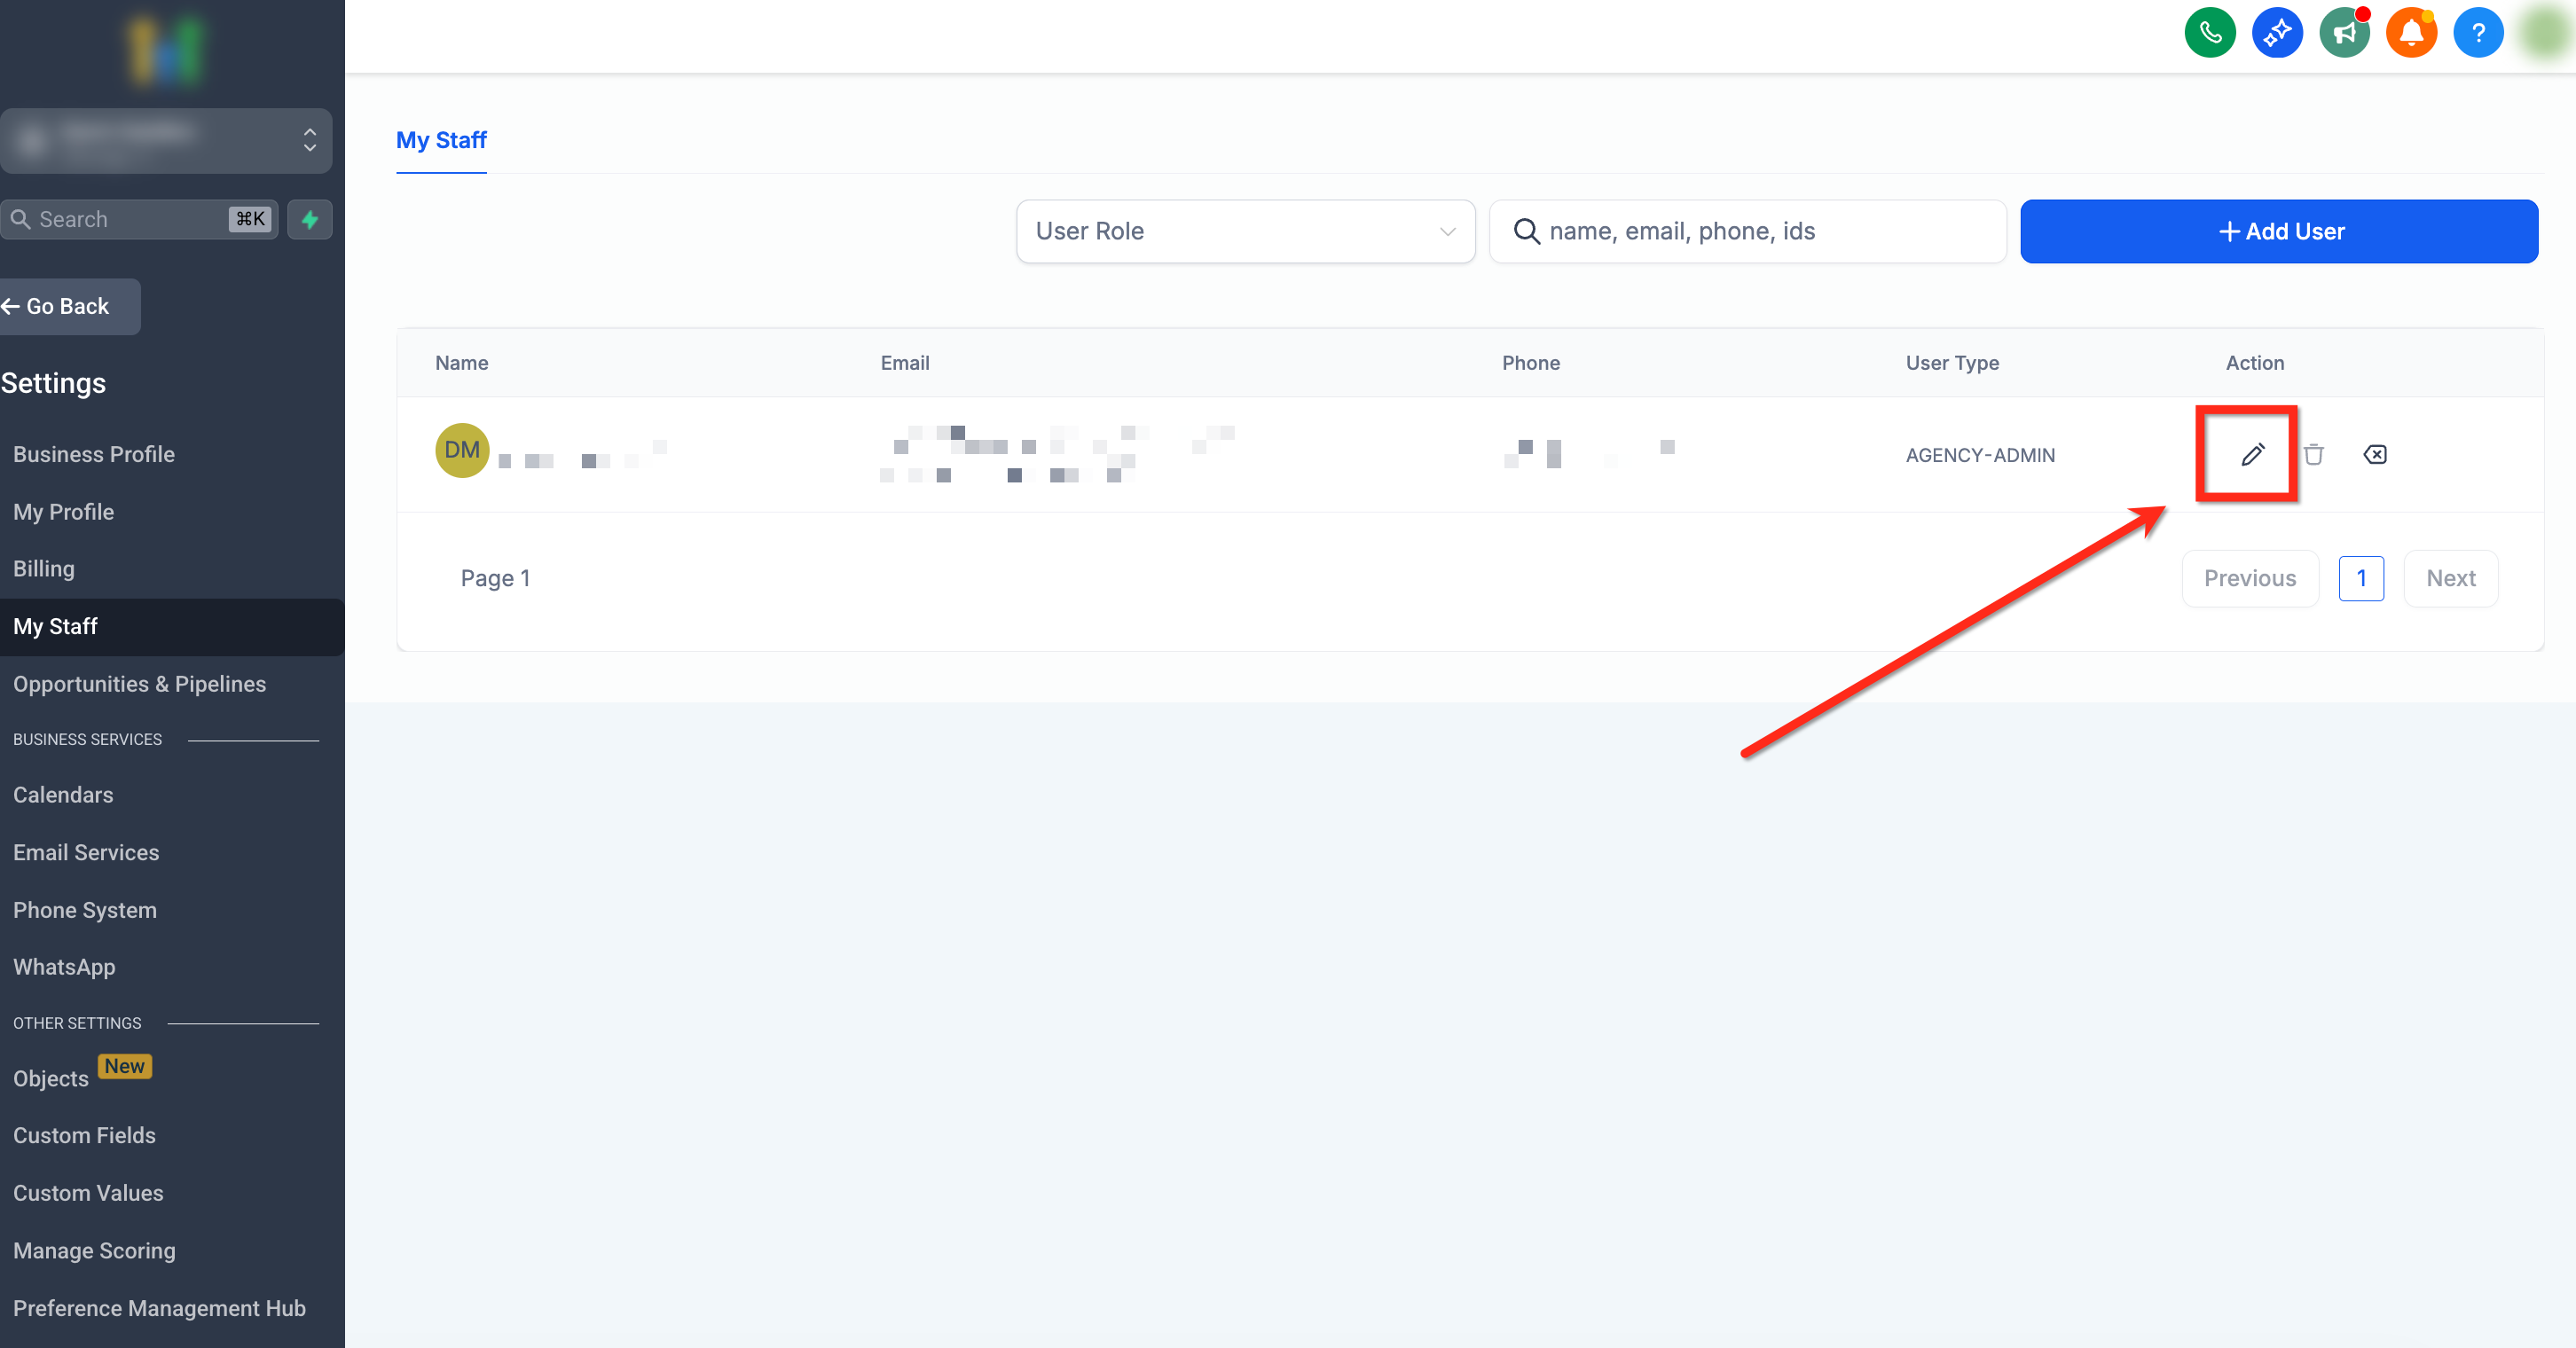
Start 30-Day Free Trial
Quick Answer

To set up or edit a staff member's email signature in GoHighLevel, go to Settings → My Staff, then select and edit the desired staff member. This process typically takes 2-3 minutes per staff member to complete.

Key Takeaways
  • Each staff member in your GoHighLevel sub-account can have their own unique, personalized email signature.
  • You can configure signatures to automatically appear in all outgoing emails or manually insert them using a custom value.
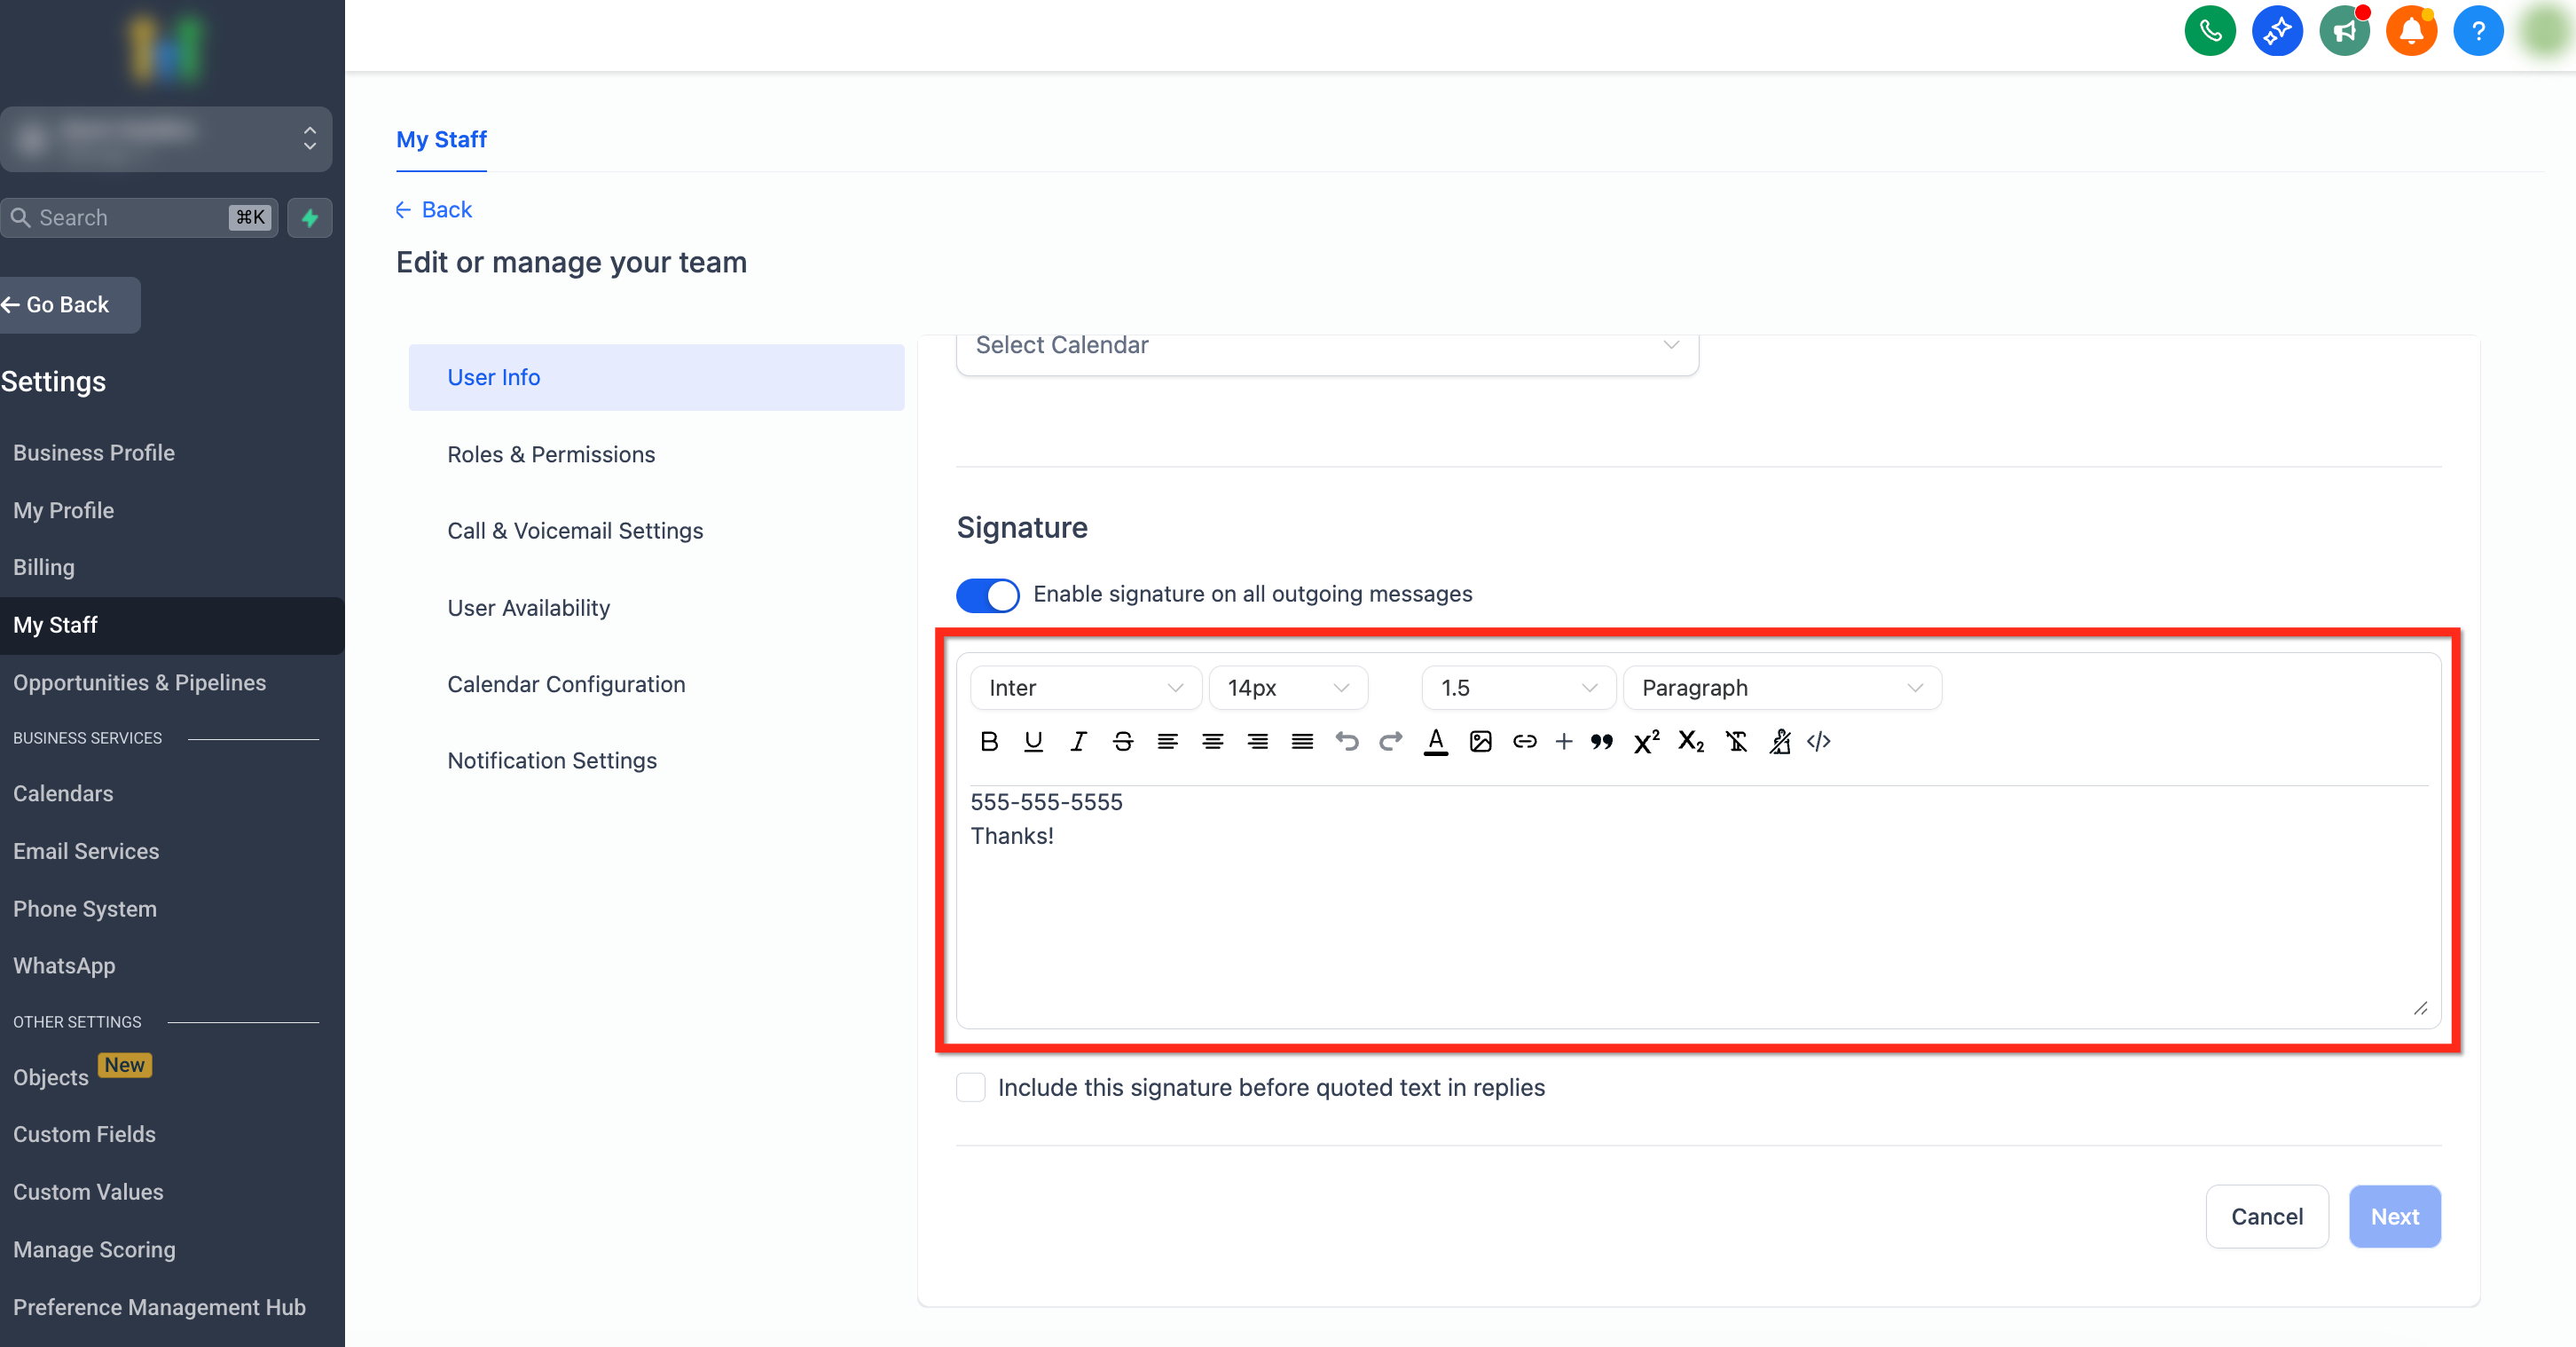
  • Use the built-in editor to format your signature with text styles, links, and even custom HTML for advanced designs.
  • Control whether your signature appears above or below quoted text in email replies for cleaner conversations.
  • Leverage the `{{user.email_signature}}` custom value for consistent branding in email templates and automated campaigns.

How to Set Up and Edit Staff Email Signatures

Creating professional email signatures for your staff in GoHighLevel ensures every message reflects your brand's identity. This helps maintain consistency, build trust, and provide essential contact information. You can customize each staff member's signature with their name, title, contact details, and even social media links. Follow these steps to set up a new signature or update an existing one for any staff member within your sub-account. This process gives you full control over how your team communicates.

1
Access Staff SettingsFirst, log into your GoHighLevel sub-account. From the left-hand menu, click Settings, then select My Staff to view your team members.
2
Select Staff Member to EditLocate the specific staff member whose email signature you want to set up or update. Click the Edit icon (a small pencil) next to their name to open their profile settings.
3
Navigate to the Signature SectionScroll down within the staff member's profile until you find the Signature section. This is where you will create and manage their unique email signature.
4
Create or Update Your SignatureUse the provided text editor to type and format your signature. You can add text, links, and apply basic formatting like bold or italics to enhance its appearance. For advanced customization, you can also paste HTML code directly into this editor.
5
Configure Signature BehaviorBelow the signature editor, you have two important options. Toggle Enable Signature in All Outgoing Messages to automatically include this signature in every email sent by this staff member. Check Include This Signature Before Quoted Text in Replies if you want the signature to appear at the top of an email reply, above any previous conversation history, for better visibility.
6
Save Your ChangesAfter making all your desired modifications, click the blue Next button, and then click the blue Save button to apply and finalize your new or updated email signature. Your changes take effect immediately.
🔥 Pro Tip

For a consistent look across all emails, consider creating a base HTML signature template outside GoHighLevel. Then, paste this code into each staff member's signature editor, only changing their personal details. This saves time and ensures brand uniformity.

Try GoHighLevel Free

Start your 30-day GoHighLevel free trial

Everything in this guide is in your free trial. 30 days, no credit card — the platform behind 78+ revenue systems.

Start 30-Day Free Trial

Some links are affiliate links — if you sign up we may earn a commission, at no extra cost to you. We only recommend GoHighLevel because we build on it every day.

How to Insert an Email Signature Using Custom Values

While automatic signature application is convenient, sometimes you need more control over placement. Using a custom value allows you to insert a staff member's signature precisely where you want it within specific emails, such as automated campaign emails or custom templates. This method is especially useful for maintaining consistent branding in marketing communications where the signature might need to appear in a unique position or only under certain conditions. The custom value for the email signature is `{{user.email_signature}}`.

1
Open an Email EditorNavigate to any email editor where you want to add the signature. This could be within Workflows, Campaigns, the Conversations email composer, or any other email creation tool in GoHighLevel.
GoHighLevel screenshot
0
2
Access Custom ValuesWithin the email editor, place your cursor where you want the signature to appear. Then, click the Custom Values button, typically located above the text editor or in a toolbar.
GoHighLevel screenshot
1
3
Select User SignatureFrom the Custom Values dropdown menu, select User. Then, choose Signature from the subsequent options. This action inserts the `{{user.email_signature}}` custom value into your email.
GoHighLevel screenshot
2
GoHighLevel screenshot

✅ Remember: The custom value `{{user.email_signature}}` will dynamically pull the signature of the staff member assigned as the 'sender' for that specific email or workflow step.

🔥 Pro Tip

Always use the custom value `{{user.email_signature}}` for emails sent through workflows or campaigns. This ensures the correct sender's signature is dynamically pulled and displayed, personalizing automated outreach.

Troubleshooting Common Issues

⚠️ My updated signature is not appearing when I send emails.
First, confirm you updated the correct staff user's signature. Then, verify that Enable Signature in All Outgoing Messages is toggled ON in their staff profile settings. Also, ensure you clicked 'Next' and 'Save' to apply changes.
⚠️ My signature is showing up in the wrong place in email replies.
Adjust the Include This Signature Before Quoted Text in Replies setting in the staff member's signature section. If unchecked, the signature appears after the quoted text; if checked, it appears before.
⚠️ The signature isn't showing in my email templates or automated campaigns.
For email templates and automated messages, you must manually insert the custom value `{{user.email_signature}}` into the email body. The 'Enable Signature in All Outgoing Messages' setting only applies to one-to-one emails sent directly from the Conversations tab or email composer.
⚠️ My signature's formatting looks broken or incorrect.
Re-open the signature editor and check your formatting. If you pasted HTML, ensure it's clean and valid. Basic formatting works best, but complex HTML can sometimes render inconsistently. Try simplifying the design or using the built-in editor's tools.

Common Mistakes to Avoid

  • Forgetting to enable 'Enable Signature in All Outgoing Messages' for automatic application.
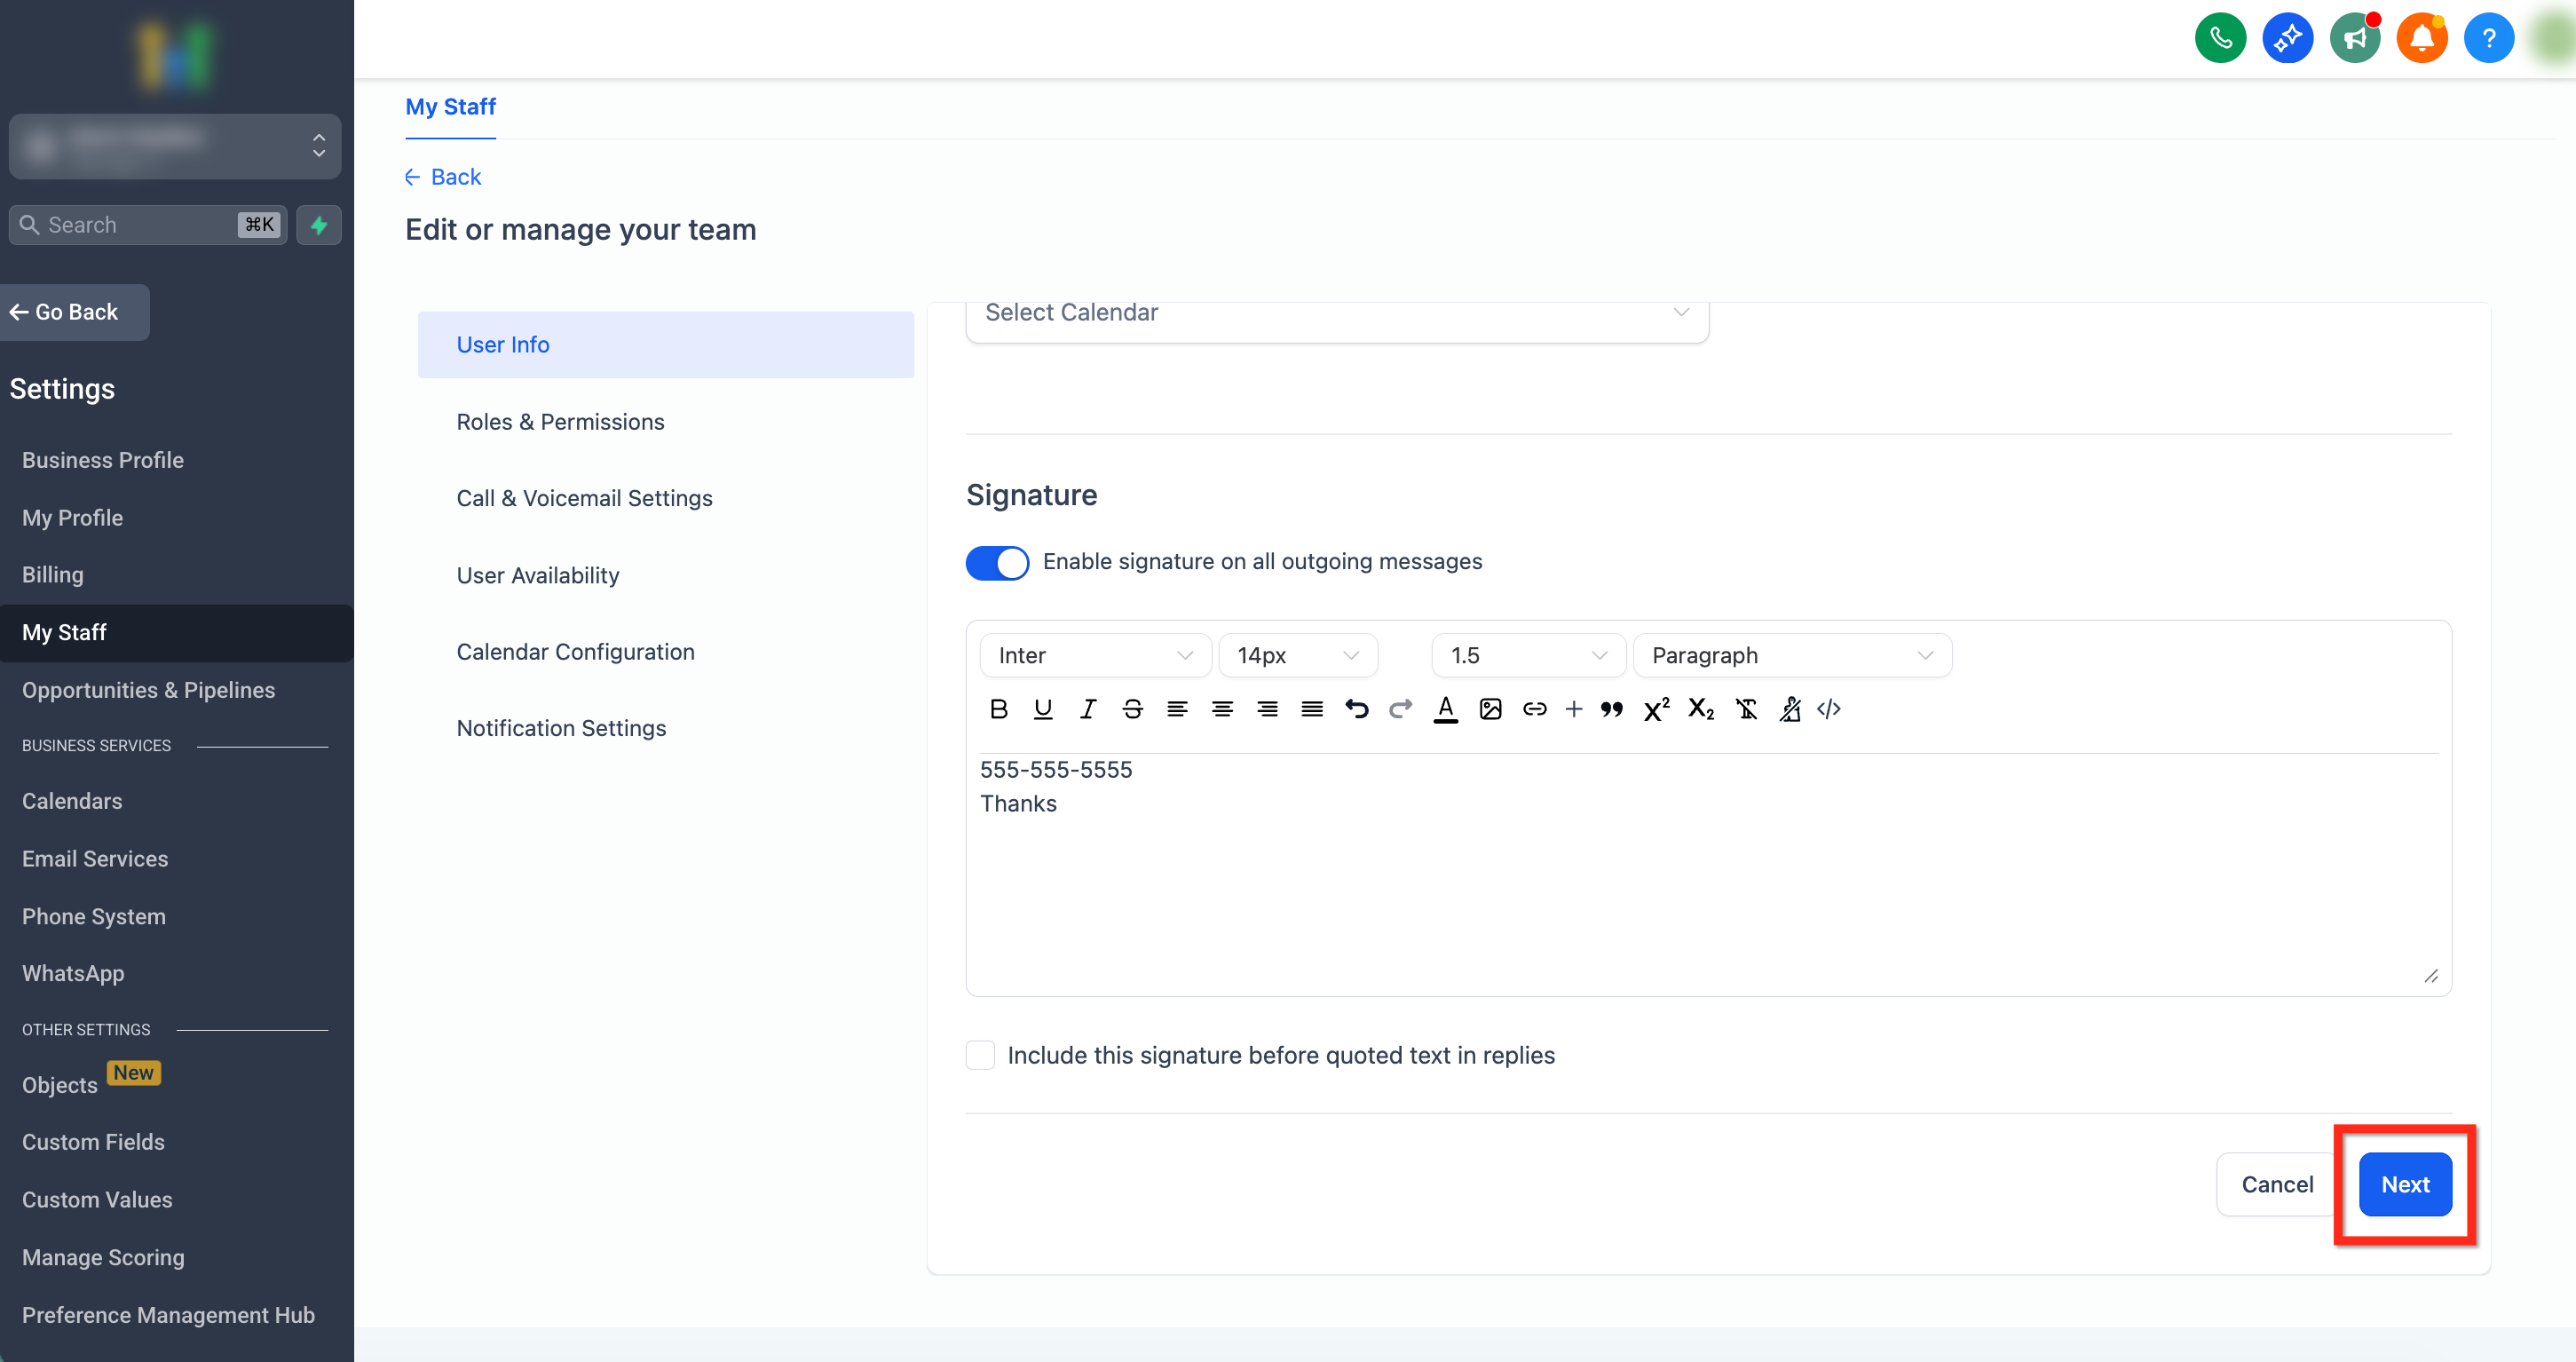
  • Not clicking both 'Next' and 'Save' buttons to finalize signature updates.
  • Expecting signatures to automatically appear in email templates without using the `{{user.email_signature}}` custom value.
  • Trying to set a single, global signature for all staff members instead of customizing each one individually.
  • Overlooking the 'Include This Signature Before Quoted Text in Replies' option, leading to signatures appearing in unexpected places in threads.

Frequently Asked Questions

QAre email signatures set per user or per sub-account in GoHighLevel?
Email signatures in GoHighLevel are saved and managed on a per-staff user basis within each sub-account. This means every staff member can have their own unique, personalized signature, reflecting their individual role and contact information. There is no single sub-account-wide signature that applies to all users; you must configure each staff member's signature separately to ensure proper personalization and branding across your team's communications.
QWhat should I check if my updated email signature isn't showing up when I send emails?
If your updated email signature isn't appearing, first double-check that you edited the correct staff member's profile. Then, go back to their **Settings → My Staff** profile and ensure the option **Enable Signature in All Outgoing Messages** is toggled ON. Finally, confirm you clicked both the blue 'Next' and 'Save' buttons after making your changes. These steps ensure your signature is correctly applied and saved within the system for outgoing messages.
QCan I add formatting, images, or links to my email signature in GoHighLevel?
Yes, you can absolutely add formatting, images, and links to your email signature. The signature editor in GoHighLevel supports basic text formatting options like bold, italics, and underlines. You can also insert hyperlinks to websites, social media profiles, or email addresses. For more advanced designs, you have the option to paste custom HTML code directly into the editor, allowing for more complex layouts and the inclusion of image URLs for logos or headshots.
QWhen should I use the custom value for an email signature versus automatic application?
You should use the custom value `{{user.email_signature}}` when you need precise control over where the signature appears, especially in email templates, automated workflows, or campaign emails. Automatic application, enabled by 'Enable Signature in All Outgoing Messages,' is ideal for one-to-one emails sent directly from the Conversations tab or email composer. Using the custom value ensures the signature is dynamically pulled and placed correctly in mass or automated communications.
QHow do I control where my signature appears in email replies within a conversation thread?
You control the placement of your signature in email replies using the **Include This Signature Before Quoted Text in Replies** setting within each staff member's signature configuration. If this option is checked, your signature will appear at the top of the reply, above the previous email's content. If it's unchecked, your signature will be placed after the quoted text, at the very bottom of the email. Adjust this setting based on your preference for conversation flow and readability.
Try GoHighLevel Free

Start your 30-day GoHighLevel free trial

Everything in this guide is in your free trial. 30 days, no credit card — the platform behind 78+ revenue systems.

Start 30-Day Free Trial

Some links are affiliate links — if you sign up we may earn a commission, at no extra cost to you. We only recommend GoHighLevel because we build on it every day.

Arsalan Zaffar
Arsalan Zaffar
Revset Labs · Revenue Systems · 78+ GHL Builds

Arsalan writes GHL guides from real build experience — 78+ systems, $9.2M in client pipeline. Wharton, CXL & Google certified.

Connect on LinkedIn
Tags:Email SignaturesGoHighLevel StaffEmail BrandingCustom ValuesGHL SettingsEmail Marketing